HOW TO MAKE YOUR OWN BABY FOOD
Making your own baby food may seem daunting, but it’s actually super easy! I personally love it because I am able to control exactly what my baby is eating. I no longer have to worry about artificial additives, preservatives, added sugars, or toxic food coloring; plus I’m able to ensure my little one is getting the proper balance of nutrients to optimize development.
Making baby food is not as time-consuming as you might think! It only takes me an hour once a week. While I make pretty much all of Eden’s baby food, I will purchase 4-5 “to go” pouches of organic baby food, just in case she gets hungry while I am at the gym and she’s in child care for 1-2 hours, plus some some organic oat cereal for breakfast, and goat’s milk to replace mama’s milk. Goat’s milk can be used as early as 4-6 months (much like cow’s milk). You’re probably thinking, “What? 4-6 months? Isn’t that way too early?” Okay, forgive me as I go off on a tangent here…

When to introduce potentially allergenic foods:
In the past, parents were advised to wait on introducing potentially allergenic foods: 12 months for cow’s milk and dairy, 24 months for eggs, even 36 months for fish, tree nuts, peanuts. However, in 2008, the American Academy of Pediatrics (AAP) retracted these recommendations, acknowledging that there was insufficient evidence to support delayed introduction of allergens as a strategy to reduce the risk of food allergy.
Since then, the American Academy of Asthma, Allergy and Immunology (AAAAI) has stated that waiting to introduce foods like wheat, cow’s milk, dairy, eggs, fish and nuts may actually increase a child’s risk of food allergy or eczema. The new AAAAI recommendations suggest that these foods be introduced as early as 4-6 months.
You may also be wondering, why goat’s milk? Well, goat’s milk has several benefits that cow’s milk does not!

Benefits of using goat’s milk instead of cow’s milk:
- More calcium, vitamin B6, vitamin A, potassium, niacin, copper and selenium
- Less allergenic protein (alpha-S1 casein)
- More digestible forms of fat
- Slightly less lactose
Cow’s milk does have more vitamin B12 and folic acid than goat’s milk; so, if you’re feeding your baby goat’s milk, make sure they are getting folate from other foods! Good sources include asparagus, lentils, broccoli, asparagus, summer squash, beans, and leafy greens. You can also buy a folic acid supplement, but this isn’t necessary if you are incorporating natural sources. I do however, recommend using an infant multivitamin with added DHA for neurological and visual development like TwinLab Infant Care Multi-vitamin Drops with DHA.
Now, onto this baby food making thing 😉

Tools you will need for making your own baby food:
Until baby has teeth and learns how to chew properly, you’re going to need mash or puree the food. You can use any of the following:
- Hand-turned food mill: a non-electric device that uses different blades for various textures of food.
- All-in-one baby-food maker: steam-cooks and then purees fruit, vegetables, and meat for your baby. Some models also defrost and reheat previously prepared food.
- Baby food grinder: very inexpensive and simple, non-electric and portable, but you don’t have a choice of textures.
- Hand blender: This useful kitchen gadget also works great for baby food! Simply place the hand blender into the cooked food you wish to puree.
- Regular kitchen blender or food processor: Chances are you have at least one of these! I use my Vitamix from Costco. You might find it less than ideal for small jobs.
- A good old-fashioned fork: Perfect for easily mashed foods like sweet potatoes, avocados, and bananas.
You will also need:
- Glass or BPA-free storage containers
- Marker (for writing date)

Choosing the best produce for your baby food:
Always buy fresh organic produce and prepare to either “feed or freeze” within 1-2 days!
Buying fresh and prepping as soon as possible minimizes nitrate exposure, which in rare cases can cause babies to develop a type of anemia called methemoglobinemia (aka “blue baby syndrome”).
Nitrate content increases the longer vegetables sit at room temperature or in the fridge, but freezing helps prevent nitrate formation. Beets, cabbage, carrots, green beans, spinach, and squash are all higher in nitrates, but this doesn’t mean they are unsafe. The risk of nitrate exposure can be mitigated by thoroughly washing, blanching, and freezing as soon as possible. Blanching (aka “parboiling”) is basically dunking the vegetables into boiling water for a couple minutes, then draining off the water. Peeling off any skin also helps to reduce nitrate exposure.
I also strongly recommend buying organic produce, meats, poultry, milk, and eggs; due to the added hormones in meats and dairy, and the chemical pesticides used on non-organic produce. The choice is up to you, but it’s worth further research before you decide.

Recommended first foods:
For your baby’s first fruits, try apples, apricots, bananas, blueberries, mangoes, peaches, pears, plums, and prunes! For vegetables try asparagus tips, avocados, carrots, peas, potatoes, sweet peppers, sweet potatoes, and winter squash. Of course, you needn’t limit yourself to these… just use them as a starting point.
Besides fruits and veggies, your baby also needs protein and some healthy fats! I typically choose one fruit or veggie, one source of protein, and one source of fat for each baby food puree I make. That way, I know my baby is getting a balanced intake.
Up until about six months of age, you’ll probably be using formula or breast milk as your baby’s primary source of protein. After six months, you can incorporate additional protein sources such as organic eggs, plain Greek yogurt, organic cottage cheese, puréed organic meats (chicken, beef, pork), puréed low-mercury fish (pollock, salmon, tilapia), puréed non-GMO tofu, and puréed legumes (lentils, beans, peas).
Avocados, nut butters, olive oil, and coconut oil are all great sources of healthy fats! You don’t need much – I will do one avocado or a couple tablespoons of peanut butter for the entire week’s worth or food. Introduce new foods one at a time so you can gauge your baby’s tolerance.

Baby’s macronutrient and calorie needs:
If you a nutrition nerd (like me), you might be wondering “how many grams of carbs, protein, and fats does my baby need?” and “how many calories they should be eating?” Well, I got you covered! Here are the official DRI’s from the Food & Nutrition Board at the Institute of Medicine, National Academy of Sciences:
Infants 0-6 months
Carbohydrates: 52-66g
Protein: 9-11g
Fats: 30g
Total calories: 520-570kcal
Babies 7-12 months
Carbohydrates: 89-107g
Protein: 11-13g
Fats: 30g
Total calories: 676-743kcal
If you’re wondering about macronutrient needs for older children, you can find that here.
Preparing your baby food:
Now that you’ve hopefully gotten a grasp on baby’s calorie and nutrient needs, let’s get to prepping!
First, you’re going to want to thoroughly wash all produce to remove dirt, bacteria, and pesticides. You can spray your produce with a fruit and vegetable wash and rinse with warm water, OR simply soak in one part vinegar to three parts water, rinse, and lay out on a towel to dry.
Next, peel any fruits or vegetables that have an outer skin or peel. This is more important when you first start introducing solids as the outer skin or peel can upset baby’s tummy. Also, trim off any inedible parts (woody asparagus stems, ends of carrots and beets). Rule of thumb: “If you wouldn’t eat it, baby shouldn’t either!”

Some fruits and vegetables are best steamed, blanched or baked before pureeing.
Very firm fruits and vegetables like apples, asparagus, cauliflower, and broccoli are easier to mash once steamed. Steaming is preferable to microwaving or boiling because you’ll retain more vital nutrients!
Like I mentioned earlier, beets, cabbage, carrots, green beans, spinach, and squash are all higher in nitrates and should be blanched (briefly boiled) and drained before preparing. If you’re buying frozen, this has already been done for you!

Potatoes and yams lend themselves to baking. Just use common sense I guess – if you prefer a certain food cooked, chances are your baby will too. However, if your blender or food processor can handle making a puree out of raw fruits and vegetables (and your baby doesn’t mind the taste) then go for it! You’ll retain more nutrients the less you cook them.
When prepping meats, poultry and fish, remove the skin and trim the fat before cooking. You can bake, broil, pan-fry, grill… whatever cooking method works for you! Once cooled, just puree the cooked meat in a blender or grind it up in a food mill with a little liquid (like broth from cooking or filtered water). Get creative and add some vegetables like peas, corn, potatoes, or yam! You can also take your favorite soups or stews and puree them for baby (as long as they aren’t too spicy).
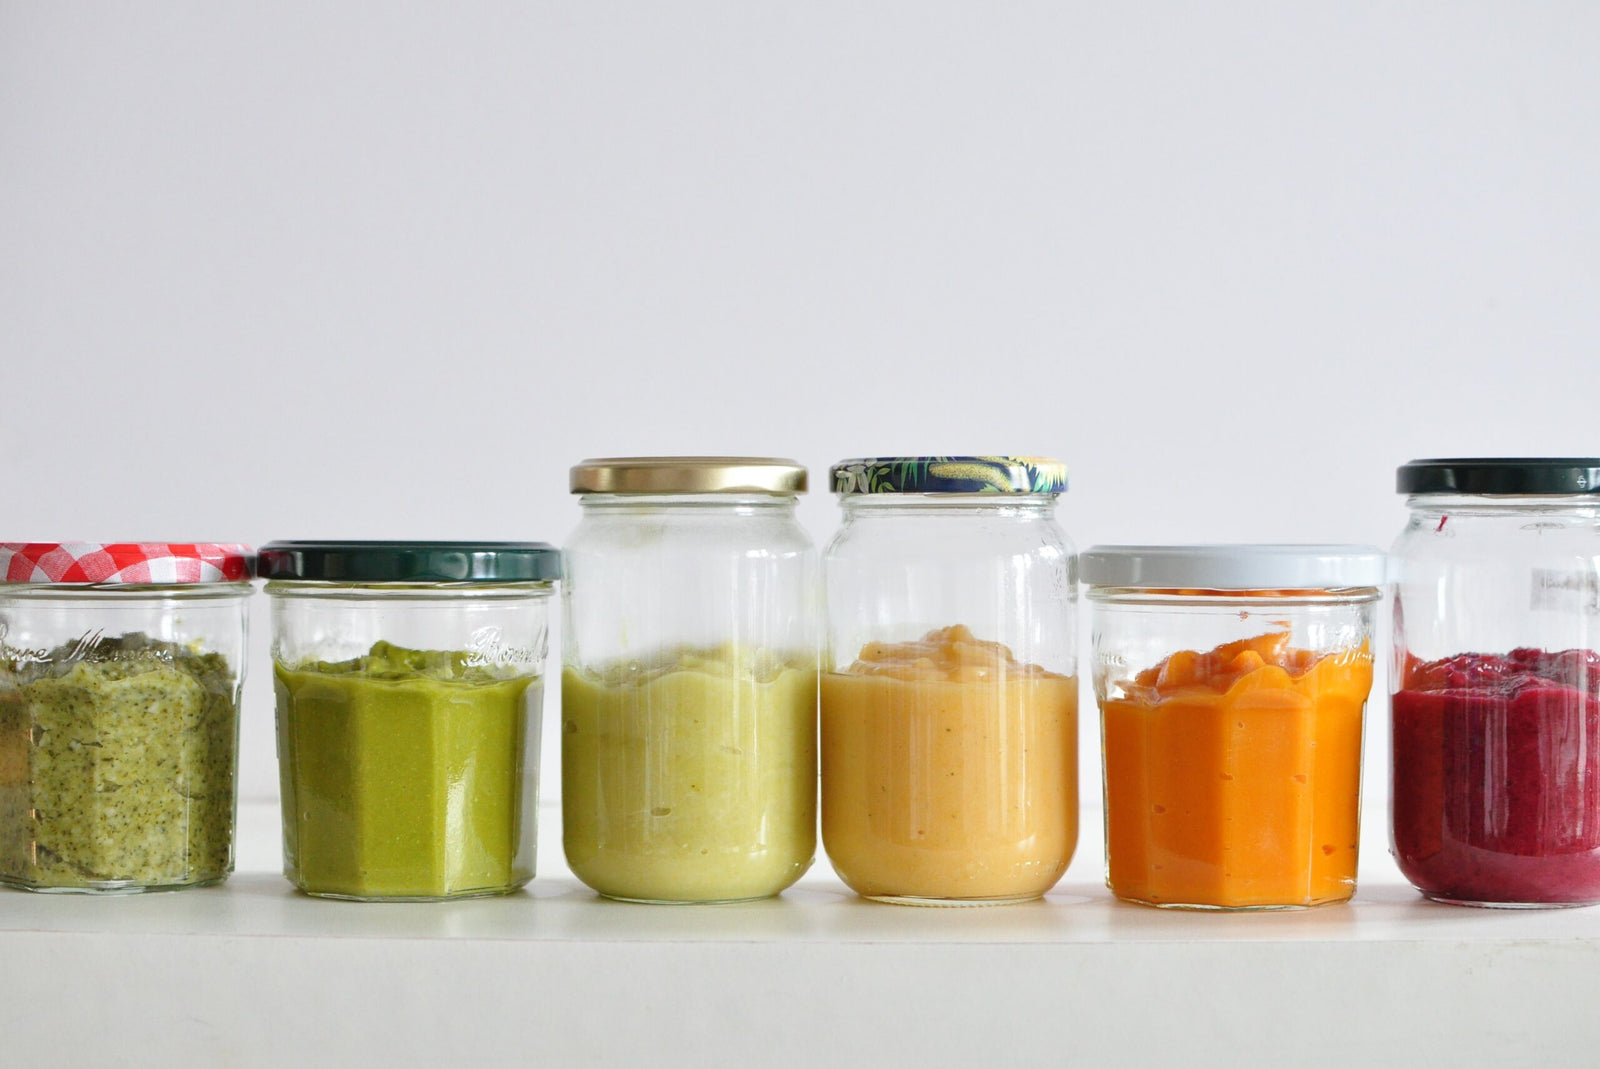
Once you have your puree or mash, set aside what you will use that day and freeze the rest! You can freeze using specialized baby food containers, or reuse glass containers like these:

Before you put the containers away in your freezer, mark the date on them so you know to toss them after three months (if they last that long!)
One of the best things about eating a healthy, balanced diet yourself is that you can use foods you’re already eating and prepare them for baby! At family meals, just take a little bit of everything and puree or chop into bite-sized pieces for the lil’ one 😉
Serving tips:
- Serve the food no warmer than body temperature.
- To thaw frozen baby food, I take 3-4 “cubes” out of the freezer and let them sit at room temperature for an hour or so. Don’t leave baby food out at room temperature for longer than 2 hours, as bacteria can start to grow.
- Be careful if using the microwave. Microwaves heat unevenly and can create “hot spots” – so stir well and let it sit for a few minutes before serving.
- Only dish out as much food you think your baby will eat. You’ll need to toss what’s left over since any saliva can cause bacteria to grow in the food.
- Don’t sweeten your baby’s food! Babies don’t need added sugars (and neither do you!). Never add honey or corn syrup, which can cause botulism (food poisoning).
- It’s okay to use seasonings! Babies will quickly learn to enjoy unique and different flavors.
- Refrigerate untouched leftovers in an airtight container and use them within 1-2 days.
That concludes everything you ever wanted to know about making your own baby food! I hope you found this article helpful and useful, and I’d love your comments below 🙂
Sources:
http://health.usnews.com/health-news/blogs/eat-run/2013/03/19/how-and-why-to-introduce-allergens-to-your-infant
http://www.parenting.com/article/ask-dr-sears-advantages-of-goats-milk
http://www.babycenter.com/0_how-to-make-your-own-baby-food_1401482.bc
http://www.cfs.gov.hk/english/multimedia/multimedia_pub/multimedia_pub_fsf_49_01.html
http://www.babycenter.com/0_age-by-age-guide-to-feeding-your-baby_1400680.bc?showAll=true
http://www.whfoods.com/genpage.php?tname=specialneed&dbid=7
Dietary Reference Intakes (DRIs): Recommended Dietary Allowances (RDAs) and Adequate Intakes (AIs), Food & Nutrition Board, Institute of Medicine, National Academy of Sciences (NAS), 1998 – 2010.
http://www.nrdc.org/health/effects/mercury/guide.asp
Also in Blog
CHOCOLATE PEANUT PROTEIN CANDY BARS (VEGAN)
PUMPKIN CHIP PROTEIN BREAD (GLUTEN FREE, DAIRY FREE)
This Pumpkin Chip Protein Bread has a rich, tender texture full of pumpkin spice and chocolate chips (no dry protein bread here). The kids and I can't get enough! Best of all, it's gluten-free, dairy-free, nut-free and easily made egg-free and vegan.
