CAULIFLOWER PIZZA CRUST (GLUTEN FREE, VEGAN, PALEO)
So I finally jumped on the bandwagon and made cauliflower pizza crust. The verdict? It’s surprisingly good! No, it’s nothing like the doughy deep-dish crust you may be used to, but it IS a delicious lower-carb vehicle for all your favorite pizza toppings! And boasts a whopping three servings of veggies per crust! All my clients who I hammer about getting 3-5 cups of veggies daily, now you can just make this pizza 😉 Did I mention it’s gluten-free, vegan, and Paleo??? There are a few tricks to simplify the process of making cauliflower pizza crust, so read on…

You can make this cauliflower pizza crust with fresh cauliflower, frozen cauliflower florets, or riced cauliflower.
Using fresh cauliflower
You can start with a large head of cauliflower, two small heads, or a couple pounds of fresh or frozen cauliflower florets or riced cauliflower. If using fresh cauliflower, you’ll want to process florets in a food processor using an S-blade or pulse in a blender until you have rice-like bits. Then dump your cauliflower “rice” into a microwave-safe container, add a couple tablespoons of water, and cook for about 7 minutes (1000 watt-microwave). Place container in the freezer to cool for 10 minutes, then dump onto a large clean dish rag (or cheese cloth) and wring out as much water as you can over the sink.

Using frozen cauliflower florets
If using frozen cauliflower florets, simply thaw by rinsing with hot water in a sieve or colander, then process/pulse in a blender and wring out water using a dish rag or cheese cloth. Squeeze out as much water as you can!
Using riced cauliflower
If using fresh riced cauliflower, just cook in the microwave, cool in the freezer, then wring out liquid. If using frozen riced cauliflower, all you have to do is line a sieve or colander with a large clean dish rag or cheese cloth, rinse with hot water until thawed, then wring out excess liquid. Squeezing out as much water as you can is key to a crispy (not mushy) pizza crust!

My favorite method
Using frozen riced cauliflower is easiest method while using a fresh head of cauliflower is probably the most time-consuming and “nightmare-ish” process. Overall, frozen is easier to process than fresh (as well as being cheaper).

Making the dough
Once you wring out all the liquid from your cooked cauliflower rice, you should have somewhat of a cauliflower “pulp” that you will combine with your ground flaxseed plus warm water (can sub for three whole eggs or six egg whites), mozzarella (use dairy or vegan, or sub one half cup of almond flour for Paleo), cornstarch (can also use arrowroot, potato, or tapioca starch), and spices (if using fresh herbs, triple the measurements).
Form your “dough” into three equal-sized circles on a baking sheet lined with parchment paper. You may need to use two baking sheets depending on the size. I also lightly coated my parchment paper with cooking spray to further avoid sticking.

Baking your crusts
Bake crusts at 400 degrees for 30 minutes, then flip carefully using a wide spatula (or two spatulas) and bake another 15 minutes on the second side. Cooking on both sides yields a crust that can be picked up versus only eaten with a fork. Once you get to this point, you have two options: (1) Freeze crusts to enjoy later, or (2) Add toppings and bake another 10 minutes to enjoy immediately! If freezing, separate crusts with sheets of parchment to prevent them sticking together and seal in a large airtight container.

Adding your toppings
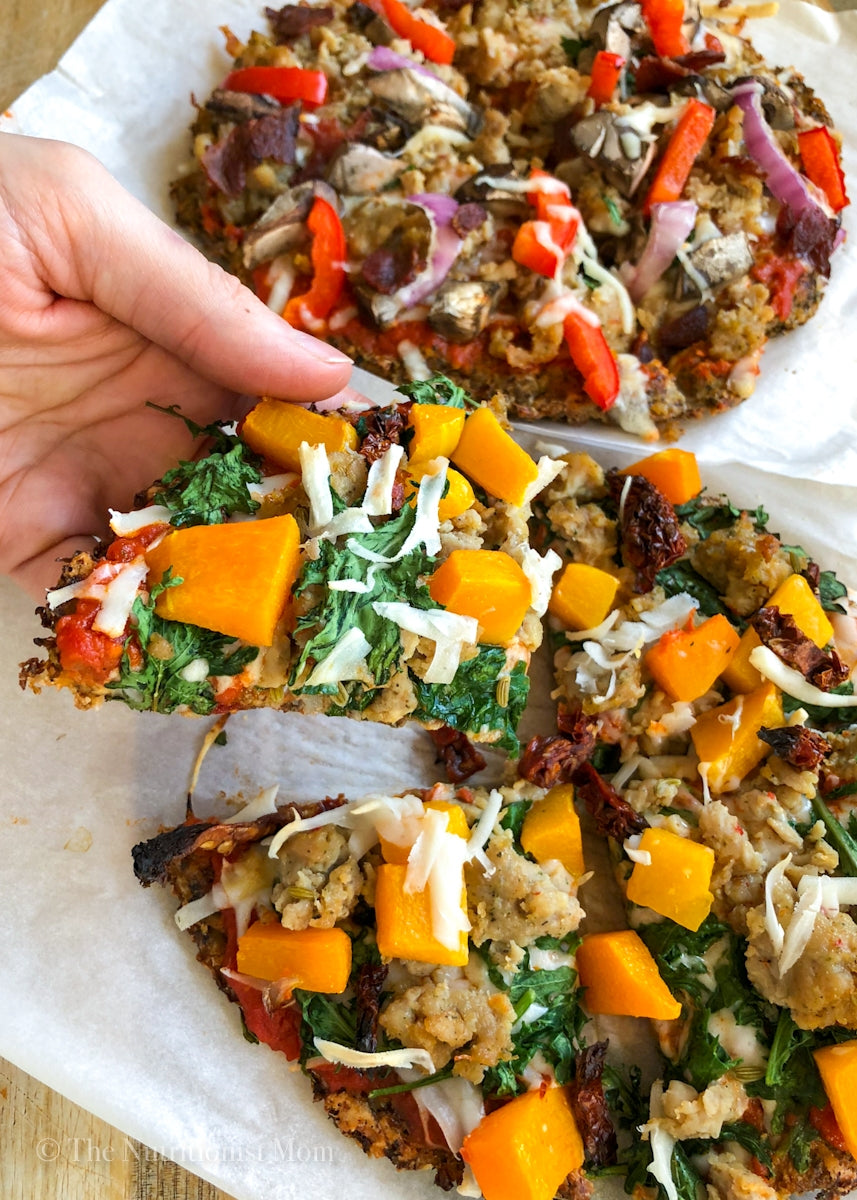
If you’re ready to enjoy your pizza now, just spread each crust with two tablespoons of marinara (I used Rao’s homemade), mozzarella cheese (can use vegan), and toppings of choice. I did one pizza with lean chicken sausage, turkey bacon, mushrooms, bell pepper, and red onion – one with lean chicken sausage, roasted butternut, kale, and sun-dried tomatoes. Get creative with whatever toppings you can dream up!

Just keep in mind, the more “loaded” your crusts, the harder they will be to eat by hand. It’s okay – even if you have to use a fork, these little pizzas are downright delicious!
I loaded mine a little too much to be honest… that’s why it’s drooping a little but oh well… it was worth it 😉 I topped one with chicken sausage, bacon, bell peppers, mushrooms, red peppers, and mozzarella. I topped the other with roasted butternut squash, kale, sun dried tomatoes, and chicken sausage. My fave was the bacon one!

Here’s the printable recipe for these Cauliflower Pizza Crusts – I’d love for you to rate and/or comment below if you try it 😉
This post contains affiliate links.
Cauliflower Pizza Crusts (Gluten-Free, Vegan, Paleo)
Ingredients
- 9 cups (2 lbs.) cauliflower, fresh or frozen
- 1/2 cup shredded mozzarella or almond flour*
- 3 tbsp. ground flaxseed + 6 tbsp. warm water*
- 3 tbsp. arrowroot starch or corn, potato, tapioca starch*
- 1 1/2 tsp. dried oregano*
- 1 1/2 tsp. dried basil*
- 1 1/2 tsp. garlic powder*
- 3/4 tsp. salt optional
*See blog post above for substitutions.
Instructions
-
Preheat oven to 400 degrees F.
-
For fresh cauliflower florets, process in a food processor using an S-blade OR pulse in a blender to make rice-like bits. Dump cauliflower “rice” into microwave-safe container, add two tablespoons of water, cover and cook for 7 minutes (~1000 watts). Cool in freezer for 10 minutes, then dump onto a large clean dish rag or cheese cloth and wring out water over sink. For frozen cauliflower florets, thaw by rinsing with hot water in a sieve or colander, then process/pulse in a food processor/blender and wring out water using a dish rag or cheese cloth. For fresh riced cauliflower, cook in microwave and cool in freezer as for fresh florets, then wring out liquid. For frozen riced cauliflower (easiest method), line a sieve or colander with a large clean dish rag or cheese cloth, rinse with hot water until thawed, then wring out excess liquid as much as you can!
-
Combine cauliflower “pulp” with ground flaxseed soaked in warm water for a couple minutes, starch, and spices.
-
Form “dough” into three equal-sized circles on a baking sheet lined with parchment paper (you may need to use two baking sheets depending on the size you have). Coat parchment paper lightly with cooking spray to avoid sticking.
-
Bake crusts for 30 minutes, then flip carefully using a wide spatula (or two spatulas) and bake another 15 minutes on the other side. Cooking on both sides yields a crust that can be picked up versus only eaten with a fork.
-
You now have two options: (1) Freeze crusts to enjoy later, or (2) Add toppings and bake another 10 minutes to enjoy immediately. If freezing, separate crusts with sheets of parchment to prevent them sticking together and seal in a large airtight container.
Notes
Also in Blog
CHOCOLATE PEANUT PROTEIN CANDY BARS (VEGAN)
PUMPKIN CHIP PROTEIN BREAD (GLUTEN FREE, DAIRY FREE)
This Pumpkin Chip Protein Bread has a rich, tender texture full of pumpkin spice and chocolate chips (no dry protein bread here). The kids and I can't get enough! Best of all, it's gluten-free, dairy-free, nut-free and easily made egg-free and vegan.
